
What is a Terminal Block: Types, How to Wire, & How to Choose
2026/03/27 SHINING E&E INDUSTRIAL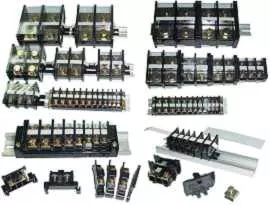
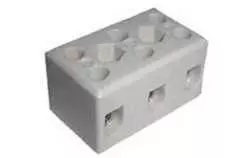
An example of a terminal block.
Check our terminal block wiring guide to learn about types, wiring steps, and how to choose the right terminal block for safe, reliable electrical connections.
Are you unsure how to connect a terminal block or what makes it essential in wiring systems? Our guide breaks it all down. You’ll learn what a terminal block is, how an electrical wire terminal block works, and the correct way to use it step by step. We’ll also explore the different types of terminal blocks available and the key factors to consider when choosing the right one for your electrical or industrial setup.
What is a Terminal Block? What are Terminal Blocks Used for?
A terminal block is a modular connector that securely joins two or more electrical wires together. It provides a safe, organized, and reliable way to manage electrical wiring in control panels, machinery, and power systems. Instead of twisting or soldering wires, terminal blocks create firm connections that are easy to maintain or replace. They are used anywhere wires need to be connected, organized, or distributed, from control panels and distribution boxes to industrial automation systems, lighting and HVAC circuits, and power supply or instrumentation wiring.
Each terminal can be labeled or numbered to make the system wiring clear and traceable. Proper labeling helps technicians identify circuits quickly, prevents wiring mistakes, and simplifies maintenance. Common methods include printed markers or engraved tags, and the best practice is to label both ends of each wire.
You may also see a terminal strip, which is a collection of multiple terminal blocks arranged in one insulated unit. It functions like a central hub for connecting several wires at once, often inside control panels. Each position on the strip acts as an isolated connection point, and barrier terminal strips include raised walls between terminals for extra safety.
How Does a Terminal Block Work?
At its core, a terminal block consists of an insulated housing (usually made from durable plastic or ceramic) that holds a conductive metal bar, usually made of copper or a corrosion-resistant alloy. The insulated body, often molded from high-strength plastic or ceramic, prevents short circuits by keeping adjacent terminals electrically isolated. When wires are inserted and secured, electricity flows through the internal metal strip, allowing multiple wires to connect and transfer current efficiently without contact between circuits.Why Use a Terminal Block?
Terminal blocks offer a safer, cleaner, and more reliable way to connect wires than soldering or taping them together. Here are the key reasons professionals rely on terminal blocks:Different Configurations/Types of Terminal Blocks
Terminal blocks are mainly categorized by structure (the number of levels or layers) and wire-securing method (the way the wire is fastened). Understanding these classifications or configurations helps in selecting the right type for your needs.
Terminal Block Types by Structure (Levels)
The classification of terminal blocks by structure, often called “levels,” refers to how many layers of connection points are stacked within a single modular block. This design helps save space and organize wiring in control panels, DIN rail systems, and electrical enclosures. Terminal blocks generally come in single-, dual-, and triple-level configurations.Single-Level Terminal Blocks
Single-level terminal blocks, also called single-feed or pass-through types, are the simplest and most widely used design. They feature one input and one output contact, providing a straightforward wire-to-wire connection.Dual-Level Terminal Blocks
Dual-level terminal blocks, sometimes referred to as double-deck types, incorporate two stacked layers of terminals within a single insulated housing. This configuration allows multiple circuits to be wired vertically, effectively doubling the connection capacity without taking up additional rail space.Three-Level Terminal Blocks
Three-level terminal blocks take the space-saving concept even further by adding a third connection layer on top of the dual-level structure. Also known as triple-level blocks, they enable multiple circuits to be wired in parallel within one compact unit.Each level can carry a separate potential, often identified as B (bottom), M (middle), and T (top) in schematic drawings. These blocks are commonly used in control and signal distribution systems, where high wiring density and organization are essential.Their compact form helps simplify complex panel layouts without compromising accessibility or safety.| Structure Type | Description | Key Function | Typical Application |
|---|---|---|---|
| Single-Level | One input and one output contact; simple pass-through design. | Basic wire-to-wire connection. | Standard DIN rail or control wiring. |
| Dual-Level | Two stacked connection layers. | Save space and support multiple circuits. | Compact panels, PCB, or feed-through wiring. |
| Three-Level | Three vertical connection layers. | Maximize wiring density and versatility. | High-density control systems or signal routing. |
Terminal Block Types by Wire-Securing Method
Terminal blocks are also often categorized by how they secure, connect, and hold wires in place, which directly affects connection strength, reliability, and ease of installation. The securing method determines how current flows through the conductor and how resistant the connection is to vibration or movement. Below are the most common types of terminal blocks based on their wire-securing method.
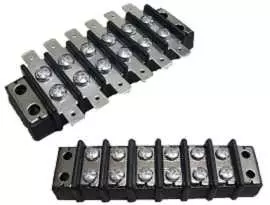
Screw Terminal Blocks
Screw terminal blocks are the most widely used connection type. Each wire is clamped into place by tightening a screw, which presses the conductor against a metal plate to form a firm electrical and mechanical bond. This design accommodates a wide range of wire sizes and is suitable for both commercial and residential wiring.Spring-Cage Terminal Blocks
Spring-cage terminal blocks, also known as spring-loaded or quick-connect types, use a preloaded spring to hold the wire securely. Instead of tightening a screw, the installer simply pushes the wire into place, where the spring maintains constant pressure.Push-In Terminal Blocks
Push-in terminal blocks simplify the process even further by allowing the user to insert a prepared wire directly into the clamping unit. No additional tools are needed, making this method ideal for high-speed assembly or modular installations.Push Button Terminal Blocks
Push-button terminal blocks are a variation of the spring clamp design. A small button is pressed to open the spring clamp, allowing the wire to be inserted. Once the button is released, the spring locks the wire firmly in place.This design combines the speed of push-in wiring with the control of manual operation, giving technicians a quick, reliable way to make connections without worrying about torque or tool precision.Pluggable Terminal Blocks
Pluggable terminal blocks use a plug-and-socket (receptacle) connection system. The wire is first secured to a removable plug (usually with a screw), and the plug is then inserted into a fixed header. This configuration allows for rapid disconnection and reconnection of entire modules, making it ideal for devices that require frequent maintenance, testing, or replacement. Pluggable types are common in industrial automation, power supplies, and modular control units.IDC (Insulation-Displacement Connector) Terminal Blocks
IDC terminal blocks are designed for mass terminations and high-efficiency assembly. Instead of stripping the insulation from the wire, the unstripped conductor is pushed into sharp metal slots that cut through the insulation to make direct contact with the conductor inside.This method saves significant time and ensures consistent connections across multiple wires. IDC types are often used in telecommunications, data equipment, and automotive harnesses where rapid, repetitive wiring is required.Barrier Terminal Blocks
Barrier terminal blocks, also called fence terminals or barrier strips, feature multiple screw terminals separated by raised barriers to prevent short circuits or arcing. This structure makes them ideal for high-voltage applications where spacing and isolation between conductors are critical. They provide sturdy, vibration-resistant connections, which is why they are frequently used in industrial power systems, HVAC controls, and machinery wiring.Blade Connection Terminal Blocks
Blade or spade terminal blocks are designed for quick insertion and removal without soldering. Each wire is crimped or soldered to a metal blade connector, which then slides onto a tab to form the connection. This system is fast, reusable, and ideal for uses that require frequent assembly and disassembly, such as test benches or modular electronic systems.Other Wire-Securing Variations
In addition to these major categories, there are several specialized variations and regional styles. Quick splice connectors and shrapnel-type spring clips provide rapid joining for low-voltage circuits. Lifting terminal blocks allow easier access during maintenance. European-style (Euroblock) terminal blocks, which use screws for stranded wires, are common in control panels and audio systems.Other Types and Specialized Functions
Beyond structure and connection method, terminal blocks can also be classified by their application function:
- Fused Terminal Blocks – Contain an inline fuse for circuit protection, often with LED indicators for blown fuses.
- Ground Terminal Blocks – Connect wires directly to system ground; in DIN-rail types, the rail acts as the grounding path.
- Thermocouple Terminal Blocks – Use metal materials matching the thermocouple wire to prevent unwanted voltage generation.
- Power Distribution Blocks – Handle high current loads using heavy-duty contacts and robust housings.
- Feed-Through Blocks – Connect two wires from opposite sides within a single housing for compact wiring.
- MCCB Terminal Blocks – Designed for molded-case circuit breakers to reduce contact resistance and enhance safety.
How to Use a Terminal Block: Step-by-Step
Wiring a terminal block correctly ensures a safe, reliable, and efficient electrical connection. Here we walk you through step-by-step for wiring a terminal block and explain how to prepare, connect, and verify wires while maintaining proper safety and performance standards.
Prepare the Wire and Tools
Before you begin, always disconnect power and verify with a multimeter that no voltage is present. Gather the right tools, including a wire stripper, screwdriver or torque driver, multimeter, labels, and protective gloves. Cut wires to the required length, leaving a little extra slack for maintenance, and use wires rated for your system’s voltage and current.Select the Right Type
Choose a terminal block that matches your circuit’s current, voltage, and wire gauge. The current rating should be higher than your circuit’s maximum load, about 150% for safety, and the voltage rating must exceed your system’s operating voltage. Check the manufacturer’s datasheet to confirm compatibility.Wire a Terminal Block
Mount the terminal block securely before wiring. Insert the stripped wire into the correct terminal slot, making sure the exposed conductor fits fully inside the clamping area.Check for Safety and Proper Connection
Once wiring is complete, perform a few key checks to ensure everything is secure and functioning properly. Here’s how to do a complete safety check:Visual Inspection and Mechanical Check
Inspect each terminal to ensure wires are fully inserted with only the proper conductor length exposed. Perform a tug test, meaning the wire should not move. Look for frayed ends, corrosion, or cracks in the housing. For stranded wires, confirm that ferrules are properly crimped for a stable connection. Lastly, check that all labels are clear and correct to prevent wiring errors during maintenance.Electrical Continuity Test
With power disconnected, use a multimeter set to continuity or low resistance mode. Place probes on the terminal points; readings under 1 ohm indicate a solid connection. Record each result, as consistent values across terminals confirm proper wiring. If resistance is high or unstable, inspect for loose screws, poor ferrule contact, or improper wire stripping and retighten as needed.Temperature Check
After the system runs, use your hand or an infrared thermometer to check terminal temperatures. A warm or hot terminal suggests excessive current or a loose connection. If detected, retighten the wire, verify the terminal’s current rating, and reduce the load if necessary. For persistent heat, consider redistributing circuits or using higher-rated terminal blocks for improved safety.What to Consider When Choosing a Terminal Block
Electrical Factors
Selecting the right terminal block begins with understanding the electrical demands of your system. A well-chosen block ensures safe power transmission, stable performance, and long service life. Below are the key electrical factors to check and how to apply them when making your decision.Current Rating
The current rating defines how much electrical current a terminal block can safely carry without overheating or degrading. Always select a model rated for at least 150% of the system’s maximum current load. This margin helps prevent excessive heat buildup that can damage insulation or loosen connections. If a terminal block becomes warm during use, it’s a clear sign that the load should be redistributed or upgraded to a higher current rating.Voltage Rating
The voltage rating determines the highest electrical potential the terminal block can safely handle. This is influenced by the insulation material, creepage distance, and pitch between terminals. Always choose a terminal block rated higher than your system’s maximum operating voltage to ensure safety and compliance. In systems with potential voltage spikes or surges, consider additional protective margins or surge suppression measures.Pole Count (Contact)
The pole count refers to how many individual circuits or connections a terminal block can manage. Common configurations range from single-pole types for simple circuits to 24 poles or more for complex wiring setups. When selecting, match the pole count to the number of circuits required in your system. It’s often practical to choose a slightly higher pole count than needed to allow for future expansion or reconfiguration.Pitch
Pitch is the distance from the center of one terminal to the next. It affects the terminal block’s voltage capability and the total space it occupies on a panel or PCB.Standard pitches include 2.54 mm, 3.81 mm, 5.0 mm, and 7.62 mm. When designing compact assemblies, use smaller pitch blocks for low-voltage circuits and wider pitches for high-voltage or higher current applications to maintain safe creepage and clearance distances.Wire Size and Type
Each terminal block is designed to accept a specific wire gauge range, typically expressed in AWG (American Wire Gauge) or mm². Using the wrong wire size can cause loose connections or overheating. Always confirm the manufacturer’s rated wire range, such as 18–4 AWG or 24–12 AWG, and ensure your wire falls within that range. Also, match the wire type to the terminal’s securing method. Stranded wires work best with screw terminals, especially when crimped with ferrules for a solid grip. Single-core wires, on the other hand, are ideal for push-in or spring-cage terminals, which rely on firm, uniform contact.Mechanical Factors
In addition to electrical ratings, the mechanical design of a terminal block greatly influences its performance, installation, and safety. When selecting one, it’s essential to evaluate how it fits physically within your setup, how it mounts, and whether it meets environmental and regulatory standards. Below are the key mechanical factors to assess and practical tips for each.Wire-Entry Orientation
The orientation of the wire entry ports determines how easily you can insert and access wires once the block is installed. Common orientations include horizontal (90°), vertical (180°), and 45° angled designs. When choosing, consider the layout of your panel or PCB and how much space is available. For example, horizontal entry is convenient for low-profile enclosures, while vertical entry saves front-panel space. A ° entry offers a compromise, good accessibility in compact designs. Always plan the orientation early in your layout to avoid difficult wiring angles later.Capacity
Capacity defines how many wires a single terminal can safely hold. Most terminal blocks are designed for one wire per connection point, ensuring firm contact and preventing overheating. Never insert multiple wires into a single terminal unless the manufacturer explicitly allows it. For higher-density systems, look for dual-wire, multi-conductor, or multi-level terminal blocks that can safely handle two to four wires per level. Always confirm the rated current capacity for multi-wire connections, as higher wire density may limit total current flow.Installation Method
The way a terminal block is installed directly affects how it integrates into an electrical system. These methods determine accessibility, maintenance ease, and space efficiency within a control cabinet or device. Below are the most common terminal block installation methods and model types used:
Some terminal blocks are defined by specialized installation or connection configurations:
Housing Design
The housing determines both the flexibility and the mechanical strength of a terminal block. Two main constructions are used:
The materials of housing are equally important. Look for housings made of polyamide (PA) or nylon, which provide excellent insulation, heat resistance, and UL94V-0 flammability compliance. High-grade materials prevent warping, cracking, and electrical leakage, ensuring consistent safety and performance.
Wire-to-Housing Method (Plug and Receptacle)
Some applications require frequent disconnections for maintenance or testing. In these cases, pluggable terminal blocks are ideal. Wires are secured into a removable plug, which mates with a fixed receptacle on the PCB or chassis. This setup enables quick modular replacement without rewiring each conductor. Use this method for hot-swappable systems or devices requiring regular inspection.
Grounding
Proper grounding ensures safety and minimizes electrical interference. Ground terminal blocks connect wires to a protective earth, often using the DIN rail as a conductive busbar. When selecting, verify that the terminal block’s grounding system is compatible with your installation’s rail type and that it maintains low resistance under high current flow.Ground terminals are available in single-, double-, and three-level configurations, depending on space and current requirements.
Safety Rating
Always check that the terminal block meets recognized safety certifications such as UL (North America) or IEC (international) standards. These certifications verify material quality, insulation resistance, and safe operating limits. Remember that UL and IEC test procedures differ, so select certifications that match your region’s regulatory needs.
Maintenance and Troubleshooting Issues with Terminal Blocks
Effective troubleshooting helps resolve issues quickly and keep systems running safely. Common problems that can cause terminal blocks to malfunction include loose connections, overheating, corrosion, and misalignment, each requiring targeted attention to restore proper performance and safety.
Loose Connections
Loose connections are one of the most common terminal block issues, often caused by under-tightened screws or vibration. They can lead to intermittent contact or arcing. Tighten the screws or clamps securely, ensuring the wire is fully seated. For stranded wires, use crimped ferrules to improve grip and prevent fraying. Recheck terminal torque periodically to maintain stable connections.Overheating
Overheating signals excessive current or poor contact, often visible as discoloration or a burning smell. Confirm the current load stays within % of the block’s rating. If a terminal feels hot, redistribute the load or switch to a higher-rated block. Proper tightening and wire preparation also reduce heat buildup and improve reliability.Corrosion
Corrosion appears as rust or oxidation and reduces conductivity, especially in humid areas. Clean terminals with a contact cleaner or wire brush, then tighten connections. To prevent recurrence, use corrosion-resistant materials like tin-plated copper and protect the system from moisture and dust.Misalignment or Poor Contact
Misalignment happens when a wire is not fully inserted or unevenly tightened, causing unstable contact. Remove and reinsert the wire, ensuring the stripped conductor fits completely in the clamp. Use a torque-limiting screwdriver to apply even pressure and maintain a firm, low-resistance connection.Terminal Block Maintenance Tips
- Inspect Regularly: Check for loose connections, corrosion, discoloration, or overheating. Perform a light tug test on each wire to confirm it’s firmly secured.
- Replace Worn Components: If a terminal block shows cracks, burns, or signs of fatigue, replace it immediately to prevent failure.
- Clean Properly: Keep the blocks free from dust and debris using an approved electrical contact cleaner. Never use water or abrasive agents.
- Use Finger-Proof Terminal Blocks: When maintenance or troubleshooting is required near live circuits, finger-proof terminal blocks help reduce the risk of accidental contact with energized parts. This added protection improves safety during inspections, re-tightening, and wire replacement, especially in control panels and distribution cabinets.
- Follow Manufacturer Guidelines: Ensure the block is rated for your application’s voltage, current, and temperature range. Avoid installing them in environments with high humidity or chemical exposure.
- Maintain Organization: Label all terminals and wires clearly to prevent confusion and simplify future maintenance or upgrades.
Shining E&E is Your Trusted Terminal Block Manufacturer
Choosing the right terminal block is about more than just making a connection; it’s about ensuring safety, performance, and reliability for every system you build. From understanding how terminal blocks work to selecting the correct type and maintaining them properly, each step plays a key role in achieving stable, long-lasting electrical performance.
At Shining E&E, we combine over 40 years of manufacturing experience with certified quality to deliver terminal blocks that meet global standards. Whether you need feed-through, barrier, pluggable, PCB, or DIN rail terminal blocks, our products are designed to support diverse applications across industrial, commercial, and electronic systems. We also offer standard models and customized solutions to fit your specific project requirements, all backed by quick response times, dependable quality, and competitive pricing.
Contact us today to find the right terminal block for your application or to request a quotation. Email us at hsichin2@ms37.hinet.net or sales@shining.com.tw for more details about our products, bulk orders, or OEM customization. Let Shining E&E help you power your business with safe, certified, and high-performance connection solutions.
Types of Terminal Blocks Available from Shining
- Din Rail Mounted Terminal Blocks
- Panel Mounted Terminal Blocks
- High Temperature Ceramic Terminal Blocks (Porcelain Connectors)
- Double Layers (Decks) Terminal Blocks
- Double Row Barrier Terminal Strips
- PCB Type Single Row Barrier Terminal Blocks
- Power Terminal Blocks
- Power Splicer Terminal Blocks
- Power Stud Terminal Blocks
- Power Splicer Stud Terminal Blocks
- Power Distribution Terminal Blocks
- Euro Type Feed Through Terminal Blocks